Optical Stent & Valve MeasurementSensorfar Medical Q vix

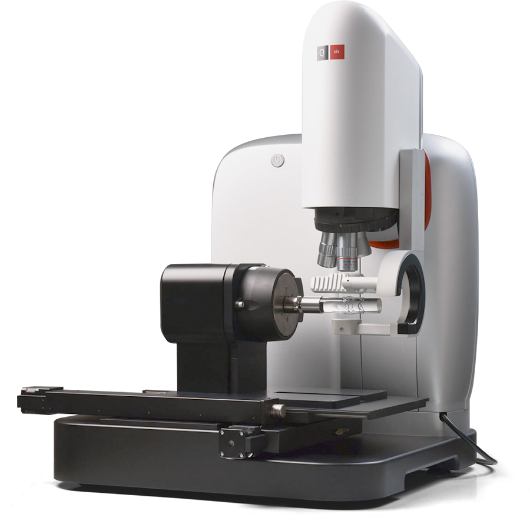
Q vix has been designed as a full solution for the inspection of stents and heart valves. The combination of state-of-the-art hardware and software makes it possible to complete the devices’ final inspection automatically and with a single tool.

Description

Q vix has been designed as a full solution for the inspection of stents and heart valves. The combination of state-of-the-art hardware and software makes it possible to complete the devices’ final inspection automatically and with a single tool.

The light source support ring of Q vix enables hundreds of light combinations that adapt each different application and device to achieve advanced illumination control. The different light support ring designs available optimize sample loading process for heart valve frames and stents. The illumination rings can support up to seven high-intensity light sources simultaneously, which are easily operated from Q vix software, adapting the illumination setup to any specific application.

Standard bright- field illumination setups can be combined with grazing illumination setups, which allows Q vix to detect tiny defects that can be seen “shining in the dark”, even at low magnifications.

The flexibility of the hardware and software of Q vix makes it the best solution for the inspection of stents and heart valves samples up to 34mm in OD, including the inspection of large peripheral stents and neurovascular devices.

It is not necessary for the inspector to remain in front of one system during the inspection, which allows a single inspector to manage up to 4 Q vix working in parallel depending on the application. In addition, after an exhaustive qualification of the system is conducted, the assisted decision made by the operator can become an automatic decision made by the software in a completely unmanned inspection facility.

Software features

SensoINSPECT can rapidly acquire and analyze high-quality unrolled images of the outer inner and both lateral surfaces of the stents and heart valves.

SensoINSPECT algorithms use sub-pixel resolution to perform strut width measurements at any point of the stent. The strut width can be automatically measured in the defined regions of interest. Dimensional analysis results are obtained with a repeatability of +/- 1µm RMS and +/- 3µm P-V. This information is overlaid onto the unrolled images with a green/red flag that indicates whether the dimensions are in or out of the accepted tolerance range, hence allowing immediate decisions to be made.

The strut wall thickness and curvature edge radius are optically measured in the regions of interest defined. A proprietary correction model is used to obtain accurate measurements based on the image acquisition speed and the illumination and observation angles.

Measurement of angles between any pair of struts is automatically performed by SensoINSPECT with high accuracy, allowing the detection of local deformations in the stent structure.

The software SensoINSPECT simultaneously identifies the edges of struts in unrolled images and uses dimensional analysis to provide an accurate assessment of the width of these edges, related with the roundness or sharpness of the stent after polishing.

Defects are automatically detected in parallel to dimensional measurements at any surface of the device providing a complete inspection in a single operation.

The proprietary detection methods in SensoINSPECT allow to automatically highlight deviations from the ideal surface of the device, based in their size and contrast. Detection methods for small and localized defects, as well as for large defects affecting an extensive area of the surface, are available. Surface defects can be detected in the outer, inner and lateral surfaces of the stent.

Software SensoINSPECT is able to automatically detect defects in the contour of the device by finding unexpected abrupt changes of the contour of the devices, and deviations from the specified dimension of the struts. A warning for the operator is showed based in the configured tolerance for the reference dimensions and curvatures.

SensoINSPECT is able to detect structural deformations in the stent based on its reference design. This allows the detection of large-scale deviations from the ideal stent design.

Being the most critical of the defects appearing in production, strut fractures are automatically detected by robust detection algorithms in SensoINSPECT.

Surface Finish Characterization

The exceptional combination of 2D and 3D technologies in Q vix allows a direct correlation of a 3D roughness measurement in the surface of the device with a 2D image of the surface in the exact same point. Sensofar Medical has successfully established statistical and structural parameters measurable from 2D images of the stent surface that consistently correlate with surface roughness parameters calculated from 3D measurements. Assessing the surface quality from 2D images provides valuable information about the device while not compromising inspection throughput

3D Modes
3D Images – Measure the depth of a hole or a scratch in the stent surface. 3D Topography of a defect can be obtained in seconds with a lateral resolution of 0.5 microns and a vertical resolution of 1 nm.

Surface Roughness – Characterize the quality of your electro-polishing process. Standard surface texture parameters are measured according to ISO 25178. The operator can select areas of interest in the outer surface of the stent as well as filtering parameters.

Coating Thickness – Check the performance of the coating process and characterize the coating uniformity. The thickness of optically transparent coatings is mapped across the width of the struts with a lateral resolution of 0.5 microns and a vertical resolution of 2 nm in just a few seconds. The minimum value of the thickness that can be measured is approximately 2 microns.
Automatic Inspection Routines
Operators using SensoINSPECT in assisted mode can take fast and reliable decisions in terms of stent acceptance. Automatic inspection routines acquire the images needed for the inspection based on the settings pre-defined by a supervisor, and simultaneously analyzes the images according to the inspection requirements and visual standards configured. Inspection Results are automatically generated and can be transferred to an external server, making the inspection process fully traceable.

Reviews

There are no reviews yet.

Be the first to review “Sensorfar Medical Q vix”